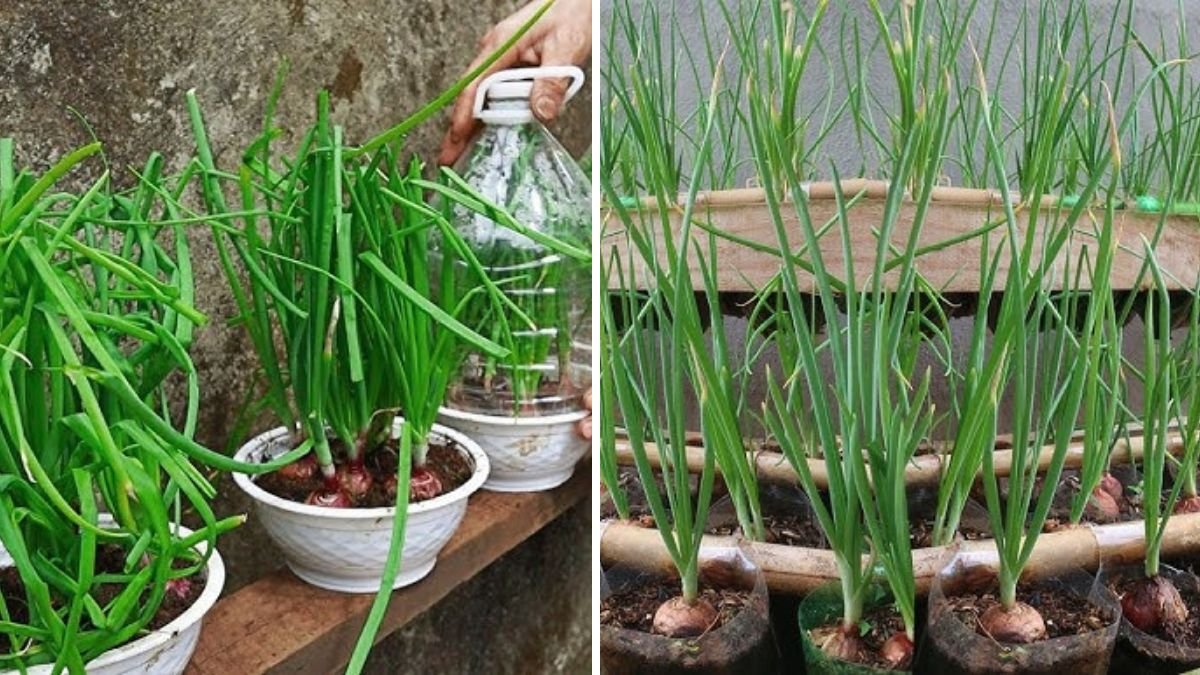
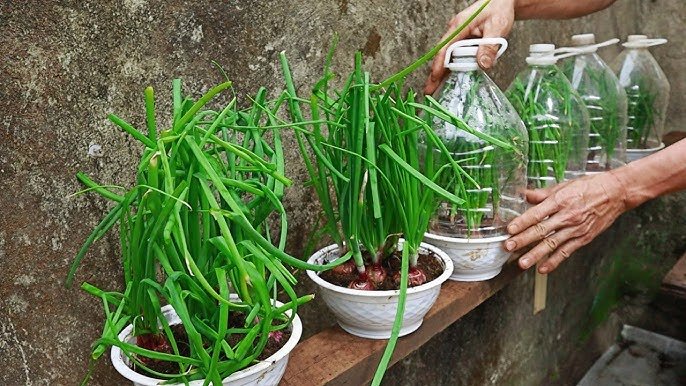
Growing onions at home has never been easier—or more creative. If you’ve ever wanted a simple, space-saving method that gives you fresh onions and green onion shoots all year round, growing them in a plastic bottle is one of the smartest gardening hacks you’ll ever see. It requires no garden, no pots, and almost no experience. With this easy technique, you can transform a simple bottle into a productive onion tower.
If you just watched someone grow onions in a plastic bottle and wondered, “Can I do this too?”—the answer is absolutely yes. This article will guide you step-by-step, from preparing your bottle to harvesting your fresh onions at home.
🧅 Why Grow Onions in a Plastic Bottle?
Onions are one of the most versatile vegetables in any kitchen. We use them in curries, soups, salads, pickles, and almost every savory recipe. But instead of buying them from the market every week, you can grow them at home using almost no space.
🌿 Benefits of the Plastic Bottle Method
- ✔️ Perfect for small homes, balconies, and windowsills
- ✔️ Zero waste—recycle plastic bottles instead of throwing them away
- ✔️ Grow multiple onions in one bottle
- ✔️ Harvest fresh green onion leaves again and again
- ✔️ Beginner-friendly
- ✔️ Looks beautiful—like a natural vertical garden
This method is especially useful for those living in apartments or urban areas.
🧴 Step 1: Choose the Right Plastic Bottle
You can use any size bottle, but the most commonly used are:
- 1.5-liter bottles
- 2-liter bottles
These give enough space for soil and multiple onion bulbs.
✔️ Preparing the Bottle
- Wash it thoroughly with soap and water.
- Use a knife or scissors to cut a few circular holes on the sides, each around 1–1.5 inches wide.
- Make 6–10 holes around the bottle, spaced evenly.
- Cut off the top portion of the bottle to create a wide opening for adding soil.
- Make drainage holes at the bottom so water doesn’t accumulate.
Your bottle is now ready to become an onion-growing tower!
🌱 Step 2: Choose the Best Onions for Planting
Not every onion works well in this method.
✔️ Best Onions to Use
- Small onions
- Shallots
- Sprouted onions
- Red or white onions with firm, healthy bulbs
If your onions have little green shoots already coming out, that’s perfect—they will grow even faster.
✔️ Avoid using:
- Old, mushy onions
- Onions with mold
- Extremely large onions that won’t fit into bottle holes
🌿 Step 3: Filling the Bottle with Soil
For onions to grow well, the soil must be:
- Light
- Well-draining
- Nutrient-rich
🧪 Ideal Soil Mix:
- 40% garden soil
- 40% compost or vermicompost
- 20% cocopeat or sand
This ensures the roots grow strong and don’t rot due to excess moisture.
🧅 Step 4: Insert the Onions into the Bottle
Here is the fun part—planting your onions!
✔️ Planting the Side Onions
- Hold the bottle upright.
- Insert one onion bulb into each hole, pointed end facing outwards.
- Make sure the bottom (root side) faces inside the soil area.
✔️ Planting Onions on Top
- Add soil layer by layer.
- Every 3–4 inches of soil, place a few onions.
- Continue until the bottle is full.
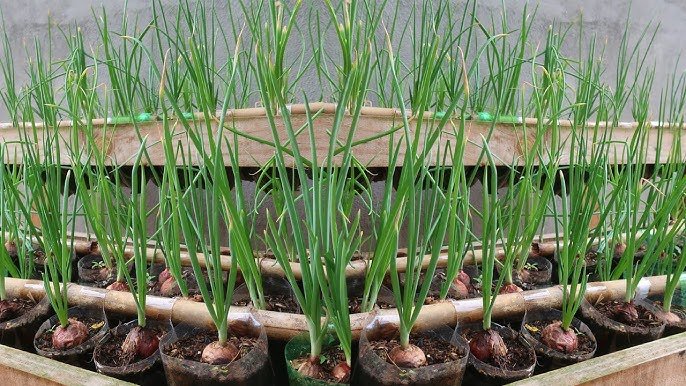
This method allows you to grow at least 10–15 onion plants in one single bottle.
💧 Step 5: Watering and Sunlight
Onions love sunlight, but they don’t love too much water.
✔️ Watering Instructions:
- Water lightly every 2–3 days.
- Ensure excess water drains out.
- Do NOT keep the soil soggy.
☀️ Sunlight Requirement:
- 4–6 hours of sunlight per day
- Indoors: place near a sunny window
- Outdoors: balcony or terrace ledge works perfectly
The better the sunlight, the faster the growth.
🌱 Step 6: Caring for Your Onion Bottle Garden
Once your onions start growing shoots, the care becomes simple.
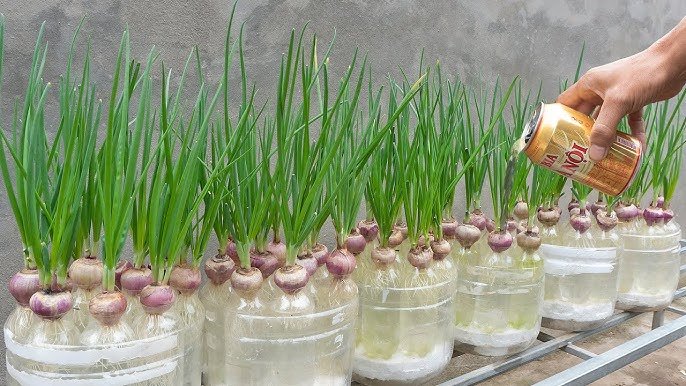
✔️ Fertilizing
Feed your plants every 2–3 weeks with:
- Vermicompost
- Liquid fertilizer (compost tea)
- Banana peel water
Onions do not require heavy feeding, so this is more than enough.
✔️ Maintaining Moisture
- Use mulching materials like dried leaves or cocopeat to keep the surface moist.
- Do not overwater.
✔️ Supporting the Bottle
As the plants grow, the bottle becomes top-heavy.
Keep it stable by:
- Placing it inside a pot
- Leaning it against a wall
- Using a bottle holder
🌿 Step 7: Watch the Magic Happen!
Within 7–10 days, you will see green shoots emerging from every hole in the bottle.
Within 3–4 weeks, they become long, edible green onion leaves.
It’s amazing how fast onions grow in this setup.
🧅 Step 8: Harvesting Your Onions
You can harvest your onions in two different ways.
✔️ 1. Harvesting Green Onion Leaves
These leaves are edible and taste amazing in:
- Soups
- Fried rice
- Omelets
- Salads
To harvest:
- Cut only the top portion.
- Leave at least 2 inches so it can regrow.
You will get multiple harvests from the same onion bulb.
✔️ 2. Harvesting Full Onions
If you want full bulbs instead of just leaves, wait for:
- Leaves to turn yellow
- Tops bending over
- Bulbs becoming big and round
This takes 2–4 months, depending on climate.
To harvest:
- Gently squeeze the soil inside the bottle.
- Pull the onion from the hole.
- Shake off excess soil.
- Let it dry for a few days.
Your homegrown onions are now ready!
🌱 Advantages of This Bottle Growing Method
Growing onions in bottles is creative, cost-effective, and surprisingly productive.
🌿 Here are the biggest benefits:
- ✔️ Saves space
- ✔️ Water-efficient
- ✔️ Uses recycled materials
- ✔️ Produces many onions at once
- ✔️ Perfect for indoor gardening
- ✔️ Great for kids and beginners
- ✔️ Looks beautiful and decorative
This is one of the best vertical gardening techniques for small homes.
💡 Pro Tips for Bigger, Healthier Onions
Keep these tips in mind for the best results:
- Use smaller bulbs for side holes, larger bulbs for top planting.
- Don’t overcrowd the bottle.
- Give good sunlight.
- Cut green leaves regularly to promote growth.
- Keep the bottle airflow rich—onions hate stagnant moisture.
- Add liquid fertilizer monthly.
The more you care, the more onions you get!
🌱 Final Thoughts
Growing onions in a plastic bottle is more than just a gardening trick—it’s a fun and eco-friendly way to bring fresh produce into your home. Whether you are a gardening beginner or simply want to save space, this bottle-growing technique works beautifully.
You’ll enjoy:
- Fresh green onions within weeks
- Full bulbs in a few months
- A unique vertical onion garden
- A rewarding DIY project
This method proves that even in small spaces, you can grow your own food and enjoy the freshness of homegrown vegetables.